How to Host Your Own Coffee Chats and Connect with Your LinkedIn Community

How to Host Your Own Coffee Chats and Connect with Your LinkedIn Community

Making connections in today’s world has been revolutionized by virtual communication. Thanks to my virtual coffee chats, I’ve been able to network virtually with so many amazing, change-maker women and I have been thrilled to build these relationships!

Today, I’m sharing how you can host your own and watch your network grow!

Step 1: Connect with Intent

Start by refining your connections. Weed out those who aren’t aligned with your goals and actively seek out those who inspire you or work in complementary fields. It’s a great way to expand your knowledge while building relationships.

This could be time-consuming, but trust me, it’s worth the effort.

Step 2: Set Up Your Booking System

Simplify your life with an efficient booking system that integrates with your calendar and platforms like Zoom. I’ve had success with both Calendly and You Can Book Me, though Calendly comes with more features on the free plan than YCBM.

Need a hand setting it up? send me an email, and I’ll guide you through the process.

Step 3: Test Your System

Before you launch, have a friend test your booking system from start to finish. This ensures everything runs smoothly and allows you to troubleshoot any hiccups before an actual call.

Step 4: Create Your Message

When inviting your connections for a coffee chat, be genuine and avoid the hard sell. Remember, you’re building relationships, not closing deals. Keep it warm, authentic, and respectful.

Step 5: Share on Social Media

While personalized DM invitations work wonders, don’t hesitate to promote your coffee chats on social media too. It casts a wider net and increases your chances of connecting with like-minded individuals.

Step 6: Slide into those DMs

Direct messages are your best bet for initiating contact on LinkedIn, rather than email, in this case. Emails often find their way into the spam folder. It keeps the conversation organic and ensures your message doesn’t get lost in the email abyss.

A Few Reminders:

  • Polish your bio; it’s your first impression.
  • Not everyone will respond, and that’s okay.
  • Some may mistake your invitation for a sales pitch—brush it off and move on.
  • Always thank your new connections for their time; it’s a precious commodity.

Bonus Tip: Share the Love

Spread the love by tagging your new friends in a weekly post. It’s a win-win situation that fosters goodwill and strengthens your network.

So, what are you waiting for? Start brewing those connections today and watch your network flourish!

If you’d rather have someone set this up for you, I can help with that! Book a free consultation call.

Social Media Myth-Busting

Social Media Myth-Busting

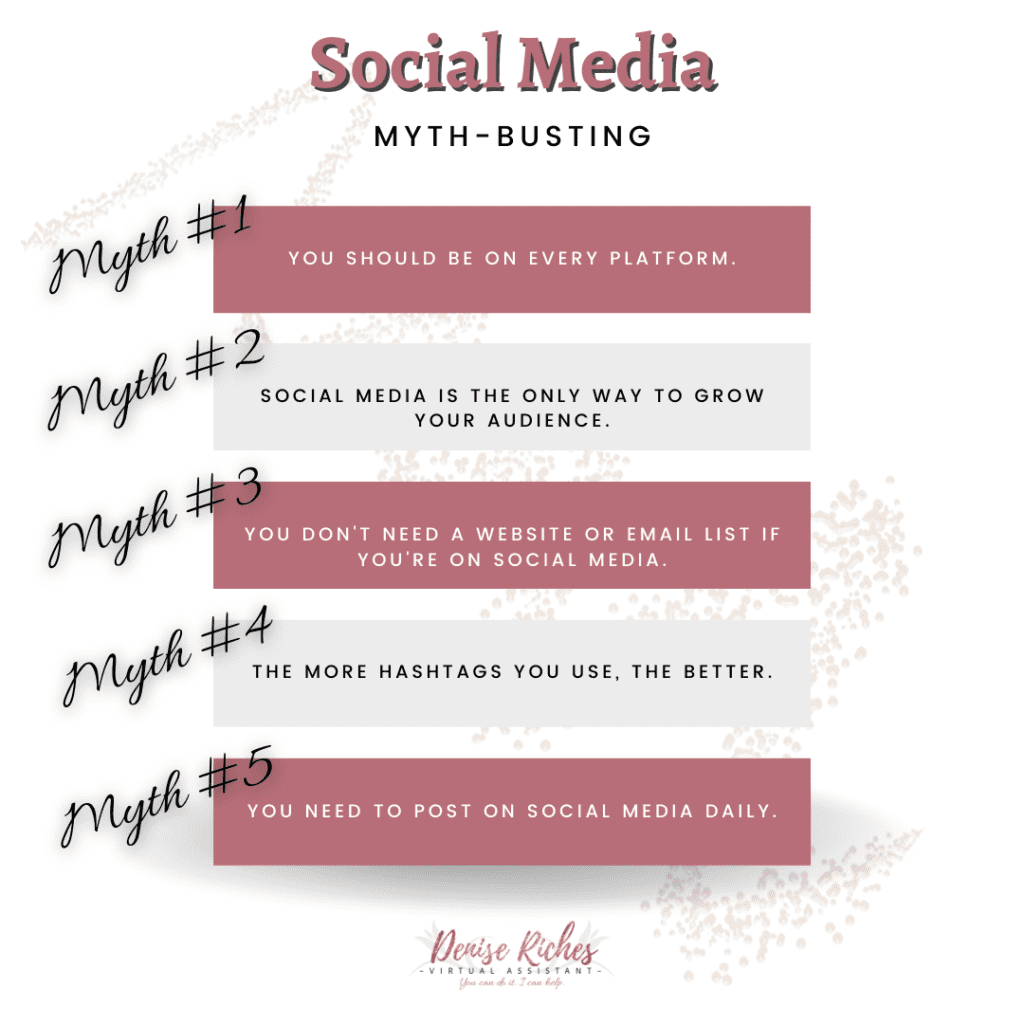
There is so much misinformation out there about the right and wrong ways of maintaining a social media presence, and if you’re not doing it right, you may be doing your business more harm than good.

This blog post is based on a social media post I shared, and I thought I’d write an extended version of it to expand on some of the key points I mentioned in that post.


Myth #1

Some people mistakenly believe that they need to be on ALL platforms, and that’s just not true. One reason you should NOT be on every platform is that, well, it’s going to be absolutely exhausting, and targeting your ideal client/customer is going to seem very hit-and-miss.

Look, if you’re on Twitter, Facebook, Snapchat, Pinterest, Instagram, Club House, LinkedIn and all the rest in between, you’re going to wear yourself out updating all of those profiles. And that’s not even the tip of the iceberg: social media is there for us to be social. We use it to connect with others, and to engage with our customers. It’s one thing to put content out there, but if ALL you’re doing it putting it out there and you’re not actually being social, it’s not really helping you or your business.

When you imagine your ideal client/customer, part of that avatar needs to include where they are hanging out on social media. Pick one, two or three platforms and stick with those – leave the rest.


Myth #2

Then there’s the whole school of thought that if you’re on social media, you don’t need to do anything else to grow your audience or customer base.

Social media should be considered a business tool, not a business solution. It should be looked at as ANOTHER way to connect with your clients/customers, rather than the ONLY way.


Myth #3

The previous myth may tie into this one, as another misconception is that if you’re on social media, you don’t need a website or an email list.

That’s simply not true.

Your business website is your store front – it’s where you should park your blog articles, services page, about page, freebie downloads and all other pertinent information about your business. It’s your home base. Everything you do on social media should either direct people to your website, OR your email list.

*Having said this, not every profession needs an email list – but it would never hurt to have one just in case.


Myth #4

We’ve all seen social media posts with endless hashtags, and with the exception of Instagram (and even they’re getting away from that), it’s just not the best way to go.

It is absolutely helpful to have a big list of hashtags for your business. A virtual assistant can do this research for you, or you can Google free hashtag tools to help you come up with that list. But don’t use them all in each post.

Instead, strategically use three or four of those hashtags with your post, then switch them for the following posts.. Rotating between them is the better bet, and can also help you to identify the best ones that lead people to your posts, and then you can use those ones more often.


Myth #5

Lastly, many people believe that they need to be posting content every day.

With the exception of Twitter, where a tweet’s lifespan is only about 2 hours, most posts are seen eventually, sometimes up to two weeks later, so no need to put out content every day.

Also, if you’re posting each and every day, it’s important to check the quality of those posts. Social media is definitely a case of quality over quantity.

In Conclusion

I’d be lying if I told you that social media doesn’t require some effort, but it shouldn’t be exhausting. It also shouldn’t be a full-time job, unless you’re a social media specialist or marketer, and that’s your profession!

In a nutshell, pick a couple of platforms where your customers are, share meaningful content once or twice per week (except Twitter – it’s cray-cray over there!), and use 3-4 effective hashtags, switching them up so you’re not always using the same ones.

I hope you’ve found these myth-busting facts helpful. 🙂

Could you use a hand with your social media? Book a free consultation call with me and we can talk about your business needs.

LinkedIn’s 10-Second Voice Message Feature

LinkedIn’s 10-Second Voice Message Feature

🤓 Are you utilizing LinkedIn’s recently added ten-second voice message feature yet?

While LinkedIn says it’s for name pronunciation, there are a lot of people using it in a lot of different (but smart) ways.

😏 How to use this feature:

1. Decide what you’re going to say in your message (your message should be 10 seconds or less).
2. Make sure you have the LinkedIn app on your cell phone.
3. Using the phone app, navigate to your profile, and click on the Edit symbol, then Name Pronunciation.
4. Hold the record button as you’re speaking. The app will give you a 5-second warning.
5. You can delete and re-record as necessary.
6. Click save.

Boom. 🤯


Need some help with social media? Book a free consultation call with me and we can talk about your business needs.

Canva Tips For Your Business

Canva Tips For Your Business

Canva is, hands-down, one of my favourite digital tools to use, not only in my own business but also in my clients’ businesses.

If you’re reading this, there’s no doubt you’ve at least heard of Canva in your travels, but if you’ve never played around with it, you’re definitely missing out.

I thought I’d share some extra tips with you – perhaps these are aspects of Canva you haven’t yet tweaked or heard of yet:


Photos

Have photos for your brand that you use and reuse, over and over again? Uploading them to Canva ensure that they are always there whenever the creative mood strikes. Plus, you never have to worry about hunting them down on your computer or an online image storage account.


Create Branded Templates

Think about where you post online most frequently, and create a template for each of those platforms. Some examples of these might be:

  • Facebook event covers
  • Instagram quotes
  • Pinterest pins/cover images
  • Twitter tweets
  • Facebook posts
  • Instagram stories

Having templates in place in your account makes creating new images for all your accounts much easier and faster because it’s simply ‘plug and go’!


Set up your Brand Kit

Having this set up will save you from having to look up the hex code for your most often used brand colours. Simply log into your account and look for ‘Brand Kit’ along the left-hand side. Once your hex codes are entered and saved, this pallette will appear whenever you need to change the colour of an asset in your designs.


Use clear and concise filenames

If you’re creating a template for Twitter, make sure “Twitter” is in the filename. The same applies to Facebook, Instagram, Pinterest, and, well, pretty much anything. It will help you to find things later when you need them.


Use your folders

Free accounts allow you two folders, while paid accounts allow for unlimited folders. Either way, you can do a lot with two folders! Be strategic with those two folders and it will make your Canva life easier.⠀


Create a media kit

Use a free media kit template to create a visual overview of your business. This makes for a handy document to send to potential clients. Simply search Designs for media kit and away you go!


Discover animations

Animations are a fun and functional way to add a little extra ‘oomph’ to your posts, and boost engagement. Use them sparingly, though, because you can definitely have too much of a good thing!


I hope you’ve discovered some new, useful ways to use Canva for your business… it’s my hope that you will grow to love Canva as much as I do.

I can save you time, money, and sanity. Intrigued? Book a free consultation call with me.

drva-signoff

VA Superpower: Creating Social Media Images

VA Superpower: Creating Social Media Images

While I help my clients with many various aspects of their businesses, one of the most enjoyable tasks I get to perform is working within Canva and creating social media images.

My day is MADE when a few different clients all need this work done on the same day 🥰

Here’s how I work:

With Clients Who Have An Existing Canva Account

For clients who have an established Canva account, it’s simply a matter of having the client share their login information with me, and this is usually done via LastPass. Once I log in, I can easily get to work.

With Clients Who Do NOT Have An Existing Account

For clients who do not have a Canva account, I’m happy to set up an account for them, and then I promptly send them the login information.

Canva Organization

I believe in keeping things as organized as possible, so if I need to create images for several platforms, I’ll often name the projects after the platform those particular images are created for. I also like to keep similar images within one single project – it just keeps Canva tidy!

To get started, it works one of two ways:

1. The client will have me research possible quotes or helpful tips, based on their business, brand or message.

2. The client will have a document they share with me, such as Google Docs, with the information I’ll need. They will often let me know the types of images they’re looking to use (one client prefers soft nature images, whereas another client likes anything with pink or purple). I also have clients that prefer I match the images to the message itself – so if it’s a tip about saving time, I may choose a stopwatch or timepiece as the background image.

Once I’ve created the series of images, I’ll copy the link to the project in Canva, and send the client an email with the link included. This simplifies the process of client approval – their time is precious and anything I can do to help with that is always appreciated.

Pending Approval

At this point, my clients have an opportunity to review the work I’ve completed and suggest changes and tweaks. I post nothing to social media without full client approval.

Next Steps

When I get the go-ahead, I’ll use whatever method works best for the client to schedule the posts to their favourite social media channels. One of my favourite social media scheduling tools is SmarterQueue (affiliate link, if you choose to create an account, we both receive compensation if you sign up for a paid plan).


Need some help with your social media? Book a free consultation call with me and we can talk about your business needs.

Social Media Support – A Case Study

Social Media Support – A Case Study

Recently, in a Facebook group for VAs, a fellow VA, who was struggling with her social media, posted that she was looking for help with SmarterQueue – one of my favourite social media schedulers. I’d missed the post and another fellow VA tagged me in a comment. I got in touch with the author of the post and we scheduled a chat to discuss what she was looking for.


Changing Systems


At the time, she’d been using Hootsuite and had a social media calendar set up in her business calendar, it contained several layers, one for each platform she was using. It was a very well-thought-out system, and extremely organized. The problem was, Hootsuite doesn’t play well with evergreen content, and she was struggling with having to invest a lot of time in topping up Hootsuite to make sure her posts were always going out. She was time-strapped and just couldn’t keep up.

She’d set up a trial for SmarterQueue and was looking for assistance with transferring all her posts from her spreadsheet to SQ.

I explained that while the initial set-up could take some time, after it was set up within SQ, all that was required afterward was general maintenance. Once I got started, it was hard for me to put the project down!


Full Steam Ahead!


We had everything set up, and she was absolutely thrilled. I did explain that the one drawback was that she has to pay attention to her Twitter posts.

Twitter shows the same post as a retweet, making the content look recycled, rather than fresh. I explained that she would need to tend to this periodically and update each tweet, just by changing a word or two in each, to avoid this.

A couple of months later, she asked me if I’d like to work together again – she wanted my help with maintaining the freshness of her content, and had some help with rewording some of her content, and needed it updated. I was so excited to continue working with a VA I admired tremendously, doing the kind of work I truly enjoyed.


SmarterQueue Can Benefit Your Business


If you haven’t read about the benefits of using SmarterQueue for scheduling your social media, you may be interested in reading this blog post I recently wrote.

If you’re interested in a trial of SmarterQueue, please check it out here.


Looking to make your job easier? Let’s talk – book a free consultation call with me. 

drva-signoff